Running Jenkins jobs in AWS ECS with slave agents

Hold on a sec though, loads of people are using it. So many that Jenkins is grinding to a halt with all the running jobs. Thankfully, we can offload those jobs to run in a completely separate container called a Jenkins slave (or agent). That way the Jenkins master can do what it does best, and we can horizontally scale Jenkins to have as many jobs running as we need.
In this article we'll cover exactly how to run Jenkins jobs in slave Fargate containers in AWS ECS. Using a worked example that you can try out yourself, you'll learn the AWS CloudFormation and Jenkins cloud configuration required to get this up and running.
This is the second article in this three-part series about deploying Jenkins into AWS. Here are details of all three articles:
- in Part 1 Deploy your own production-ready Jenkins in AWS ECS we explored how to setup a robust Jenkins master in AWS using CloudFormation
- in Part 2 Running Jenkins jobs in AWS ECS with slave agents (this article) we get slave jobs running in ECS through a full worked example, doing all the cloud configuration manually for a full understanding of the process
- in Part 3 Using Jenkins Configuration as Code to setup AWS slave agents we'll improve what we had in part 2 by setting up our Jenkins master's cloud configuration automatically using Jenkins Configuration as Code
Jenkins master and Jenkins slaves
The master/slave relationship in the software world describes a relationship where some worker service is controlled by a master service. This is also sometimes known as a master/agent relationship within Jenkins documentation. We'll use these terms interchangeably throughout this article.
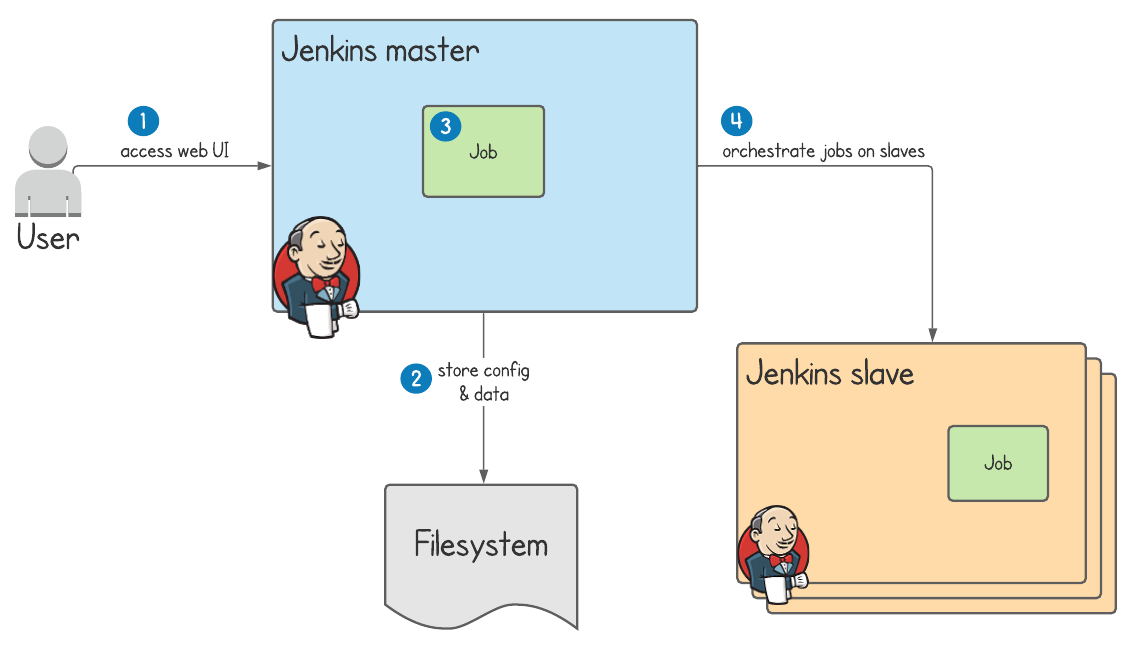
The Jenkins master has the responsibility to:
- serve the web UI
- store configuration and job data on disk
- run jobs on itself
- orchestrate jobs to run on slaves (the topic of this article)
As is best practice when using AWS, we're working across multiple availability zones to ensure high availability in case one goes down. In the above example, the Jenkins slave could be created in either availability zone.
Communication between Jenkins master and AWS ECS
In step 2 of the diagram above Jenkins communicates with AWS ECS to start an ECS task for the Jenkins slave. Maybe you're thinking how does this communication work?
Well, Jenkins has the concept of clouds which you can setup within the Configure Clouds web UI. Adding a cloud configuration means Jenkins can start running jobs on slave agents. In order to be able to configure Jenkins to use AWS ECS we'll be using the amazon-ecs Jenkins plugin, which is covered in full detail in the worked example.
At this point though, it's enough to know that Jenkins can communicate with the AWS ECS API given:
- the amazon-ecs plugin
- the correct amazon-ecs plugin configuration
- the correct AWS permissions to allow Jenkins to create tasks
Communication between a Jenkins slave and Jenkins master
In step 4 of the above diagram a communication link is established between the Jenkins slave and its master. It's important to understand that this is initiated by the slave, rather than the other way round.
During this communication the Jenkins slave is asking for instructions of what it should do. Under the hood Jenkins uses a technology called JNLP (Java Network Launch Protocol), which allows the Jenkins master to run whatever it needs to on the resources made available by the slave.
All you really need to know about this communication is that:
- the slave initiates communication with the master as soon as it starts up
- the master sends instructions back to the slave
- the slave executes those instructions i.e. runs a Jenkins job
A worked example
In this worked example we'll extend the CloudFormation template created in the article Deploy your own production-ready Jenkins in AWS ECS. Specifically, we will add:
- a new IAM policy attached to the Jenkins master to allow it to do AWS ECS operations such as starting and stopping tasks
- a security group for the Jenkins slave allowing it to make requests to its master
- a new security group rule for the Jenkins master's security group, allowing inbound requests from the slave
- a discovery service, to enable the Jenkins slave to communicate with the Jenkins master without going outside of our private AWS network
- access to the JNLP port in the Jenkins master container definition
Once we've made these changes we'll add the amazon-ecs plugin to Jenkins, and create a Cloud Configuration to allow Jenkins to create slaves within our AWS ECS cluster.
Finally, we'll setup a basic pipeline job and see it run on a newly created Jenkins slave. As if by magic! ✨
CloudFormation
Using AWS CloudFormation means we can describe all the AWS resources as a YAML template, making the environment reproducible. Let's run through the template definitions for the additional resources we need to add on top of what we created in the previous article.
IAM policy for Jenkins master to be able to create ECS tasks
We need to add the following policy to the JenkinsRole resource, the IAM role assigned to the Jenkins master ECS task:
        - PolicyName: create-jenkins-agents
          PolicyDocument:
            Version: '2012-10-17'
            Statement:
              - Action:
                  - ecs:RegisterTaskDefinition
                  - ecs:ListClusters
                  - ecs:DescribeContainerInstances
                  - ecs:ListTaskDefinitions
                  - ecs:DescribeTaskDefinition
                  - ecs:DeregisterTaskDefinition
                Effect: Allow
                Resource: '*'
              - Action:
                  - ecs:ListContainerInstances
                Effect: Allow
                Resource:
                  - !Sub arn:aws:ecs:${AWS::Region}:${AWS::AccountId}:cluster/${ClusterName}
              - Action:
                  - ecs:RunTask
                Effect: Allow
                Condition:
                  ArnEquals:
                    ecs:cluster:
                      - !Sub arn:aws:ecs:${AWS::Region}:${AWS::AccountId}:cluster/${ClusterName}
                Resource: !Sub arn:aws:ecs:${AWS::Region}:${AWS::AccountId}:task-definition/*
              - Action:
                  - ecs:StopTask
                Effect: Allow
                Condition:
                  ArnEquals:
                    ecs:cluster:
                      - !Sub arn:aws:ecs:${AWS::Region}:${AWS::AccountId}:cluster/${ClusterName}
                Resource: !Sub arn:aws:ecs:${AWS::Region}:${AWS::AccountId}:task/*
              - Action:
                  - ecs:DescribeTasks
                Effect: Allow
                Condition:
                  ArnEquals:
                    ecs:cluster:
                      - !Sub arn:aws:ecs:${AWS::Region}:${AWS::AccountId}:cluster/${ClusterName}
                Resource: !Sub arn:aws:ecs:${AWS::Region}:${AWS::AccountId}:task/*
              - Action:
                  - iam:GetRole
                  - iam:PassRole
                Effect: Allow
                Resource: !GetAtt JenkinsExecutionRole.Arn
The majority of what you see above is what's recommended in the documentation for the amazon-ecs Jenkins plugin. Specifically, it adds the ability to:
- create task definitions -- a task definition is a description of an ECS task that will at some point be run. It contains things like the Docker image to be run, and allocated memory & CPU.
- run tasks -- an ECS task can be run from the provided task definition
- stop tasks -- Jenkins can stop tasks if required
- describe clusters, task definitions, tasks -- Jenkins can query resources to get their current state
Finally, I've also added to this policy the iam:getRole and iam:PassRole permissions.
This is needed so that when Jenkins master runs the Jenkins slave task, it can be run with a specific execution role. The execution role will allow logs from the Jenkins slave to be written to the AWS logging service CloudWatch, so we can see what's going on if there are any problems.
ECS task execution role -- an ECS task is started by what's called an ECS agent. This agent can be given extra permissions to make API calls, via the task execution role.
Jenkins slave security group
The Jenkins slave needs to make requests to the Jenkins master. It also might need to call out to the internet in order to complete its jobs e.g. downloading project dependencies.
  JenkinsAgentSecurityGroup:
    Type: AWS::EC2::SecurityGroup
    Properties:
      GroupName: JenkinsAgentSecurityGroup
      GroupDescription: Security group for Jenkins agents
      VpcId: !GetAtt VPCStack.Outputs.VPC
The above security group is simple because by default a security group:
- denies all inbound access (nothing should need to call the Jenkins slave directly)
- allows all outbound access
Jenkins master security group rule
To allow the Jenkins slave to make requests to the Jenkins master, the following rule needs to be attached to the JenkinsSecurityGroup resource:
  JenkinsJenkinsAgentSecurityGroupIngress:
    Type: AWS::EC2::SecurityGroupIngress
    Properties:
      IpProtocol: tcp
      FromPort: !Ref JenkinsJNLPPort
      ToPort: !Ref JenkinsJNLPPort
      GroupId: !Ref JenkinsSecurityGroup
      SourceSecurityGroupId: !Ref JenkinsAgentSecurityGroup
Note that we strictly limit inbound access from the JenkinsAgentSecurityGroup only.
The port used is defined at the top of the CloudFormation template, and its default value is 50000, the default Jenkins JNLP port.
Discovery service allowing the Jenkins slave to find its master
Adding the below resources simply means that the Jenkins slave can communicate with the master using a friendly URL like https://jenkins.jenkins-for-ecs-with-agents:50000. This domain name resolves to the private IP of the Jenkins master ECS task.
  PrivateNamespace:
    Type: AWS::ServiceDiscovery::PrivateDnsNamespace
    Properties:
      Name: !Ref AWS::StackName
      Vpc: !GetAtt VPCStack.Outputs.VPC
  DiscoveryService:
    Type: AWS::ServiceDiscovery::Service
    Properties:
      DnsConfig:
        RoutingPolicy: MULTIVALUE
        DnsRecords:
          - TTL: 60
            Type: A
          - TTL: 60
            Type: SRV
      Name: jenkins
      NamespaceId: !Ref PrivateNamespace
Update the JenkinsService (the ECS service) to include the following section, which means that the Jenkins master ECS service will register the private IP address of the ECS task against the DNS name defined above.
      ServiceRegistries:
        - RegistryArn: !GetAtt DiscoveryService.Arn
          Port: !Ref JenkinsJNLPPort
The DNS name is formed from the discovery service name concatenated with the private namespace name.
In our case, this will be jenkins.jenkins-for-ecs-with-agents.
Update Jenkins master task definition to open access to JNLP port
The Jenkins master task definition JenkinsTaskDefinition already allows access on port 8080, the default Jenkins port.
The following PortMappings definition will open up access to port 50000, so the Jenkins slave can talk to its master.
- ContainerPort: !Ref JenkinsJNLPPortAll of the above resources you can see defined inline in the CloudFormation template jenkins-for-ecs-with-agents.yml.
Launch the Jenkins CloudFormation stack
Time for action! Now that we've run through the CloudFormation changes you can go ahead and launch the CloudFormation stack into your own AWS account.

Now don't forget to:
- add a DNS CNAME record into your domain's DNS provider pointing to the application load balancer domain name.
This means can access Jenkins on your preferred domain name (e.g.
in my case
jenkins.tomgregory.com). - grab the token from the logs of the Jenkins ECS task, and use it to gain access to your Jenkins instance
New CloudFormation resources
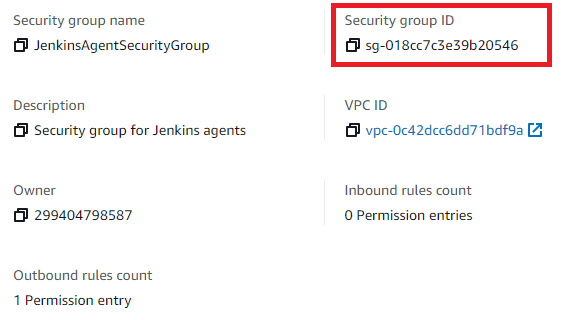
Go to Services > EC2 > Security Groups and see the new JenkinsAgentSecurityGroup. Make a note of its ID as you'll need it later on.
Go to Services > Route 53 > Hosted zones and click on the jenkins-for-ecs-with-agents hosted zone.
You should see some DNS records, including an A record which ECS has automatically added via the discovery service.
It means that the DNS name jenkins.jenkins-for-ecs-with-agents will resolve to the private IP of our Jenkins master ECS task.

Now click Save and Finish.
We still need to install the amazon-ecs Jenkins plugin, so go to Manage Jenkins > Manage Plugins > Available and search for amazon-ecs. If you see multiple search results make sure to select the plugin named Amazon Elastic Container Service (ECS) / Fargate, then click Install without restart.
Configuring an ECS cloud
Once the amazon-ecs plugin is installed we can create a cloud configuration so Jenkins master can spawn ECS slaves.
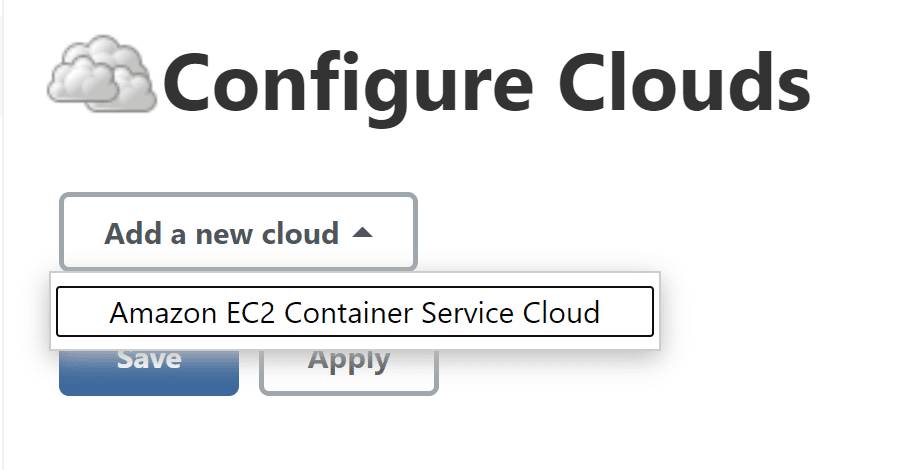
Go to Manage Jenkins > Manage Nodes and Clouds > Configure Clouds. Click on Add a new cloud and you should be able to select Amazon EC2 Container Service Cloud.
A new form will appear which we're going to fill out with the following values to provide Jenkins with AWS access. Leave any values that aren't specified below as the default. Time for some copy and pasting I think!
| Field name | Field value | Description |
|---|---|---|
| Name | ecs-cloud | |
| Amazon ECS Region Name | <select the region where you deployed the CloudFormation> | |
| ECS Cluster | <select default-cluster which should auto-populate once you've chosen the correct region> | |
| Click Advanced | ||
| Tunnel connection through | jenkins.jenkins-for-ecs-with-agents:50000 | Host and port via which the Jenkins slave can create a secure JNLP connection to the master. |
Next to ECS agent templates click the Add button. This will allow us to define a template for a Jenkins slave ECS task.
| Field name | Field value | Description |
|---|---|---|
| Label | ecs | This label will be used to select the correct Jenkins slave agent in our pipeline definition in the next section |
| Template Name | jenkins-agent | This name will form part of the task definition name |
| Docker Image | jenkins/inbound-agent:alpine | The alpine image is slightly smaller, giving a small improvement in the ECS task startup time (see the Performance section or full details) |
| Launch type | FARGATE | Fargate means we don't have to provision any EC2 instances, as AWS take care of that |
| Operating System Family | Linux | The Docker image we're running is Linux-based |
| Soft Memory Reservation | 2048 | This is a suggested value. Provide whatever you like under Supported Configurations for Fargate. |
| CPU units | 1024 | This is a suggested value. Provide whatever you like under Supported Configurations for Fargate. |
| Subnets | <paste two private subnet ids, separated by comma> | Find the subnet ids under Services > VPC > Subnets. Look for Private Subnet 1 and Private Subnet 2. |
| Security Groups | <paste the id of the JenkinsAgentSecurityGroup> | We copied this id earlier |
| Click Advanced | ||
| Task Execution Role ARN | <paste the ARN of the jenkins-execution-role> | Go to Services > IAM > Roles, search for jenkins-execution-role, and copy its ARN. |
| Logging Driver | awslogs | |
| Logging Configuration | Enter the following Name/Value pairs to configure Jenkins slave logs to be written to AWS CloudWatch | |
| awslogs-group | ECSLogGroup-jenkins-for-ecs-with-agents | |
| awslogs-region | <enter the region where you deployed the CloudFormation> | |
| awslogs-stream-prefix | jenkins-agent |
Be careful to enter all the above values correctly, since one single mistake will mean that Jenkins won't be able to create a slave and the job won't complete.
Finally, click Save.
Trying it out
Now that we have all the Jenkins cloud configuration sorted we just need to create a job to run on the Jenkins slave.
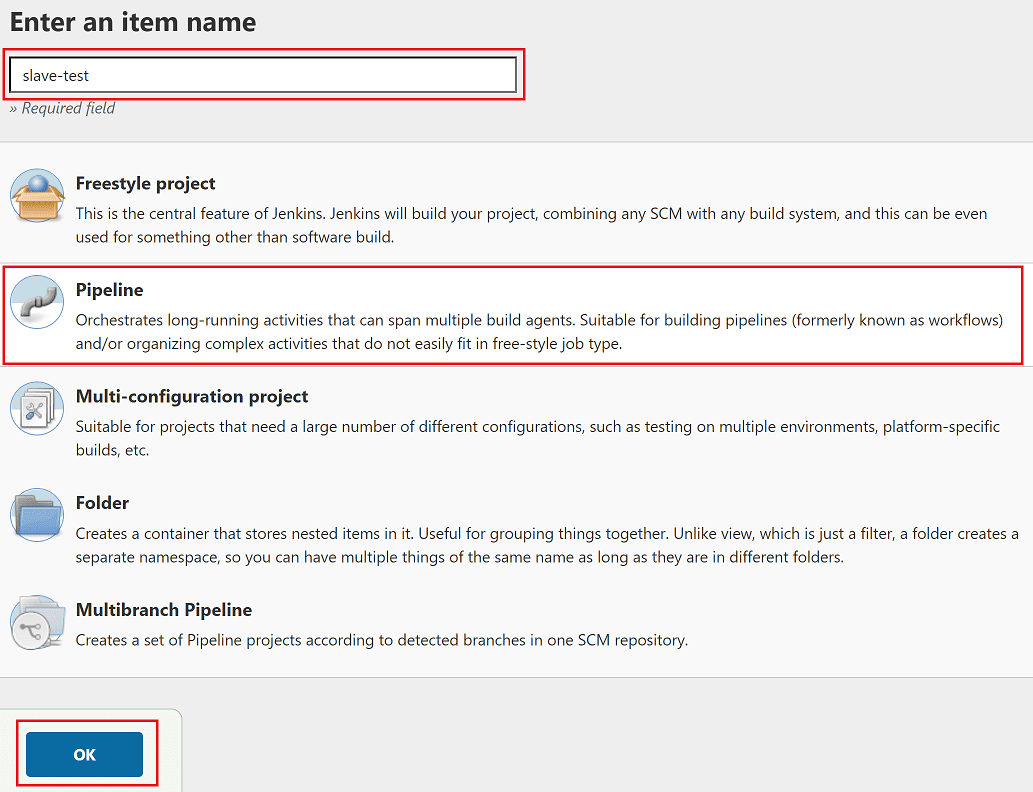
In Jenkins select New Item, enter a name such as slave-test, select Pipeline, then click OK.
On the new job's configuration page scroll down to the Pipeline section and paste in the following example Pipeline script:
pipeline {
  agent {
    label 'ecs'
  }

  stages {
    stage('Awesomeness') {
      steps {
        echo 'Hello from Jenkins slave!'
      }
    }
  }
}
Not the most useful Jenkins job ever invented, but importantly:
- the pipeline is configured to run on an agent with label ecs. This matches the Label field in the ECS agent template configuration setup earlier.
- the pipeline has a single stage which prints out a silly message
Now all that's left to do is the fun bit! Click Build Now. 🤞
Click on the flashing grey circle to see the build's Console Output. First off it will look like this:
Started by user tom
Running in Durability level: MAX_SURVIVABILITY
[Pipeline] Start of Pipeline
[Pipeline] node
Still waiting to schedule task
‘Jenkins’ doesn’t have label ‘ecs’
The phrase ‘Jenkins’ doesn’t have label ‘ecs’ is Jenkins lingo for I don't have a slave like that, but I'll create one for you.
As long as everything is configured right, you'll be able to see an ECS Task starting up under Services > Elastic Container Service > default-cluster > Tasks.

Soon the ECS task will be in the RUNNING state and you'll see the following Console Output in Jenkins.
Running on ecs-cloud-ecs-39cg6 in /home/workspace/slave-test
[Pipeline] {
[Pipeline] stage
[Pipeline] { (Awesomeness)
[Pipeline] echo
Hello from Jenkins slave!
[Pipeline] }
[Pipeline] // stage
[Pipeline] }
[Pipeline] // node
[Pipeline] End of Pipeline
Finished: SUCCESS
Awesome! Our job is saying hello to us! So we got a job running on a Jenkins slave at last.
The ECS task will disappear right away after the job has completed Pretty neat, huh?
What if it didn't work?
Don't worry, this happened to me a lot while writing this article. Just go to Manage Jenkins > System Log > All Jenkins Logs and scroll to the bottom. Normally a descriptive error should tell you what has been misconfigured.
If you need more help you can always shoot me an email at tom@tomgregory.com. I'm nice like that. 😉
More details on this setup
Here are some more details to lift the lid on the above setup.
URLs required by the slave
You may have noticed during the setup above that there are 2 different URLs at play:
- the Jenkins URL: configured when you first logged into jenkins, this URL is used by the Jenkins slave to make an HTTPS request to
/tcpSlaveAgentListeneron the master - the tunnel connection through URL: configured on the Configure Cloud page, this URL is used by the Jenkins slave to create a private connection to the master using the JNLP protocol
When the slave gets run in ECS, if you select the task you'll see all the details related to how the task was run. This includes the command, which passes both URLs to the slave.

Job performance in Fargate
Whilst there's a lot to be said for using the Fargate launch type, it's normally a bit slower to startup than using the EC2 launch type, because:
- the Docker image has to be downloaded every time an ECS task starts
- AWS needs to provision resources for running the container
From my testing, the alpine version of the jenkins/inbound-agent Docker image is marginally quicker to start because of its reduced size (125MB vs. 225MB). Using that image, the example job described in this article completes in about 57 seconds. By contrast, to run the same job on the Jenkins master takes 4 seconds, so the majority of the 57 seconds is spent starting the ECS task rather than actually running the job.
Although this startup time seems reasonable for many Jenkins job workloads you might need to run, there's still room for improvement which hopefully AWS will implement some time soon.
Final thoughts
Setting up Jenkins to run jobs on AWS ECS slave agents is a straightforward way to introduce horizontal scalability to your continuous integration process. Consider how you could apply this to your own projects to make developer feedback quicker, and ultimately increase your throughput of work.
Although all the AWS resources used in the example were created in a reproducible way with CloudFormation, the Jenkins configuration leaves a lot to be desired. In the next article Using Jenkins Configuration as Code to setup AWS slave agents we'll setup cloud configurations in a repeatable and less error-prone way rather than via the UI.
To avoid incurring unnecessary charges, don't forgot to tear down your CloudFormation stack by going to Services > CloudFormation, selecting jenkins-for-ecs-with-agents, then clicking Delete.
Resources
CloudFormation
- here's the CloudFormation template jenkins-for-ecs-with-agents.yml
- launch the stack in your own AWS account by clicking the magical button below
Documentation
- high-level documentation about Jenkins distributed builds
- GitHub page for the Amazon ECS Jenkins plugin
- documentation for the
jenkins/inbound-agentDocker image used in the example
If this is a problem you're dealing with in your own team, you can see how I approach software delivery in practice.